RED LOBSTER’S CHEESE BISCUIT (IN A LOAF)
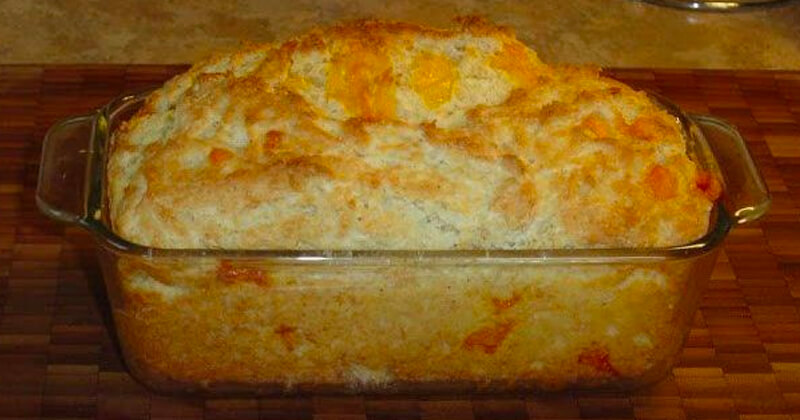
If you’ve ever found yourself daydreaming about those irresistible cheesy, garlicky biscuits from a certain seafood restaurant, get ready for a game-changer. This recipe takes all that glorious flavor and bakes it into a convenient, sliceable loaf. It’s a quick bread that’s moist, tender, packed with sharp cheddar and fragrant garlic, and finished with a brush of buttery, herb-infused goodness. It’s perfect for dipping into soups, alongside a weeknight dinner, or simply enjoyed on its own with a cup of coffee.
My husband, bless his heart, is a true connoisseur of anything cheesy and carb-loaded, and those restaurant biscuits have always been a particular weakness of his. For years, I’d try to replicate them, often ending up with a kitchen covered in flour and individual biscuits that, while delicious, felt like a lot of fuss. Then, one evening, preparing a simple pasta dinner, I had a flash of inspiration: why not bake the biscuit dough as a loaf? The first time I pulled that golden, aromatic loaf from the oven, the smell alone had him floating into the kitchen. He grabbed a slice, still warm, and declared it “even better than the original, because it’s ours.” It’s been a staple ever since, a dish that guarantees smiles and empty plates, a testament to how some of the best culinary moments come from simplifying and making things your own.
You may also like:
Why You’ll Love This red-lobsters-cheese-biscuit-in-a-loaf
Here’s a beautiful way to enjoy all the savory, cheesy goodness you adore, without the fuss of individual drop biscuits. This loaf is incredibly easy to prepare, relying on simple pantry staples and a quick mixing method that doesn’t require any special skills. It’s wonderfully versatile, pairing perfectly with anything from a hearty chili to a light salad, making it a reliable staple for busy weeknights or relaxed weekend meals. Plus, the sheer joy of pulling a warm, aromatic loaf from the oven, ready to be sliced and shared, is an experience in itself. It offers comfort and satisfaction in every tender, cheesy bite.
Behind the Recipe
What I’ve really learned while perfecting this recipe is the delicate balance between tenderness and flavor. The key truly lies in not overworking the dough—overmixing is the archenemy of tender quick breads. I’ve found that a light touch, mixing just until the dry ingredients are barely moistened, ensures that soft, crumbly texture we all crave. Another small but mighty detail is the quality of your cheese; a good sharp cheddar makes all the difference. And that final brush of garlic butter after it comes out of the oven? Absolutely non-negotiable. It infuses the warm crust with an extra layer of garlicky aroma and helps keep the exterior wonderfully tender. Don’t skip it!
Shopping Tips
- Cheese: Opt for a block of sharp cheddar cheese and grate it yourself. Pre-shredded varieties often contain anti-caking agents that can affect how smoothly the cheese melts and integrates into the loaf.
- Dairy: Buttermilk is essential for the distinctive tang and tender crumb in this recipe. If you don’t have any, you can make a quick substitute by adding a tablespoon of lemon juice or white vinegar to regular milk and letting it sit for five minutes.
- Butter: Always use unsalted butter so you can control the overall saltiness of the loaf. Keep it very cold and cut into small pieces before adding it to the flour mixture for the best texture.
- Flour: Standard all-purpose flour works perfectly here. There’s no need for any specialty flours to achieve a wonderful texture.
- Garlic Powder: This is a key flavor component. Make sure your jar isn’t ancient—fresh garlic powder has a much more potent and vibrant flavor than an old, stale one.
- Fresh Herbs: While dried parsley is fine, a sprinkle of fresh chopped parsley mixed into the dough or as a garnish for the glaze really brightens up the flavor and adds a lovely visual pop.
Prep Ahead Ideas
You can grate your cheese and measure out all your dry ingredients (flour, baking powder, salt, garlic powder) into a bowl the day before. Cover them tightly and store them in the fridge or pantry. This means on baking day, you just need to cut in the cold butter, add the wet ingredients, and you’re almost ready to bake!
Time-Saving Tricks
If you’re really pressed for time, using a food processor to cut the cold butter into the flour mixture can save a few minutes and some elbow grease. Just be careful to pulse only a few times until the mixture resembles coarse crumbs, to avoid overworking the dough. Pre-shredded cheese can also be used in a pinch, though the melting quality might be slightly different.
Common Mistakes
The most common mistake is overmixing the dough. Once you add the wet ingredients, mix only until the flour streaks disappear. Lumps are okay; overmixing develops gluten, leading to a tough, dry loaf. Another pitfall is using warm butter; cold butter creates pockets of steam that result in a flakier, tender texture. Lastly, don’t skimp on the cheese—this loaf is meant to be generously cheesy!
What to Serve It With
This savory cheese biscuit loaf is incredibly versatile! It’s fantastic alongside a steaming bowl of homemade chili, a hearty lentil soup, or a creamy tomato bisque. It also makes a wonderful accompaniment to roasted chicken, a simple steak dinner, or even a robust pasta dish. Think of it as your new favorite savory sidekick.
Tips & Mistakes
Don’t be shy about adjusting the amount of garlic powder to your personal taste; some like it extra garlicky! Also, ensure your oven is fully preheated before putting the loaf in, as consistent temperature is crucial for proper rise and even baking.
Storage Tips
Store in airtight containers in the fridge. It reheats beautifully, but if you sneak a bite cold straight from the container, it still works.
Variations and Substitutions
For cheese, feel free to experiment with a mix of cheddar and Monterey Jack, or even a little Parmesan for an extra savory kick. If you don’t have fresh parsley, dried works perfectly well, or you could try a pinch of dried chives or dill for a slightly different herby note. For a bit of heat, a tiny pinch of cayenne pepper in the dough adds a subtle warmth without being overtly spicy. While buttermilk gives the best flavor and texture, a milk and lemon juice/vinegar substitute is a perfectly acceptable alternative.
Frequently Asked Questions

RED LOBSTER’S CHEESE BISCUIT (IN A LOAF)
Ingredients
Main Ingredients
- 3 cup all-purpose flour
- 2 teaspoon baking powder
- 0.5 teaspoon baking soda
- 1 teaspoon kosher salt
- 2 tablespoon granulated sugar
- 0.5 cup unsalted butter cold, cut into cubes
- 8 ounce sharp cheddar cheese freshly shredded
- 0.75 cup buttermilk or whole milk + 1 tablespoon lemon juice
- 2 piece large egg
- 1 teaspoon garlic powder optional
- 1 tablespoon dried parsley for topping
- 3 tablespoon melted butter for brushing
Instructions
Preparation Steps
- Preheat the oven to 375°F (190°C). Grease a standard loaf pan and line with parchment if desired.
- In a large bowl, whisk together the flour, baking powder, baking soda, salt, and sugar until evenly combined.
- Cut the cold butter into the dry ingredients using a pastry cutter or fork until the mixture resembles coarse crumbs with pea-sized pieces of butter.
- Fold in the shredded cheddar cheese so it is evenly distributed through the flour mixture.
- In a separate bowl, whisk together the buttermilk and eggs until smooth. Pour the wet ingredients into the dry ingredients and stir gently until just combined — do not overmix.
- Spoon the batter into the prepared loaf pan, smoothing the top with a spatula. Sprinkle the top with a little extra shredded cheddar and the dried parsley.
- Bake for 25 to 30 minutes, or until the top is golden and a toothpick inserted in the center comes out clean.
- Remove the loaf from the oven and immediately brush the top with melted butter mixed with the garlic powder. Let the loaf cool in the pan for 10 minutes, then transfer to a wire rack to cool slightly.
- Slice and serve warm. Store leftover slices tightly wrapped at room temperature for up to 2 days or refrigerate for up to 5 days.
Notes
Featured Comments
“Super easy and absolutely loved! My family asked for seconds. Saving this one.”
“New favorite here — absolutely loved. vibrant was spot on.”