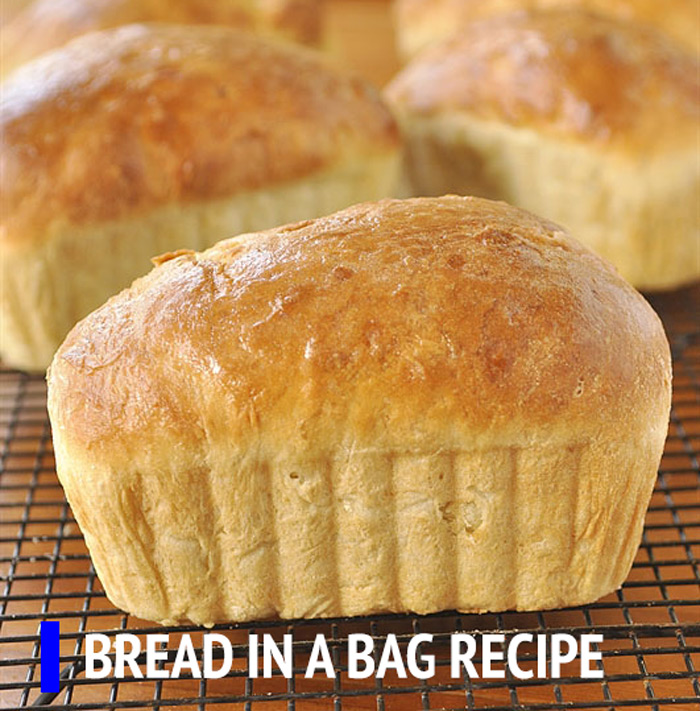
BREAD IN A BAG – One of my favorite bread of all time!
There’s something truly magical about turning a few humble ingredients into a warm, crusty loaf of bread right in your own kitchen. And if the idea of kneading dough or wrestling with sticky messes has ever held you back, prepare to have your world (and your kitchen counter) transformed. This “bread in a bag” method is a revelation, allowing you to achieve a beautiful, artisan-style loaf with minimal effort and surprisingly easy cleanup. It’s perfect for anyone who craves that fresh-baked aroma and taste but needs a simpler, less intimidating approach to bread making.
My husband, bless his heart, is a man who appreciates a good carb, and for years, store-bought sourdough was his go-to. Then came the lockdowns, and like many, we embarked on a journey of home baking. I dabbled with various no-knead recipes, but the sheer mess of mixing in a bowl or handling wet dough always felt like a minor ordeal. One evening, after a particularly sticky session, I was venting my frustrations to him, and he jokingly suggested, “Why don’t you just mix it in a Ziploc bag?” A lightbulb went off! I experimented, tweaked, and eventually landed on this “bread in a bag” technique. It quickly became our Sunday ritual, proofing quietly on the counter while we watched a movie, then baking off into a golden, craggy loaf perfect for a hearty dinner or next morning’s toast. Now, the mere mention of “bread night” brings a smile to his face, knowing a perfect, rustic loaf is just a bag and a Dutch oven away.
You may also like:
Why You’ll Love This bread-in-a-bag-one-of-my-favorite-bread-of-all-time
You’ll adore this No-Knead Artisan Bread in a Bag because it simplifies bread making dramatically; no messy counters or sticky hands required for the initial mix. Its hands-off approach means minimal active time for a maximum reward: a truly rustic, beautifully textured loaf. The long, slow fermentation develops incredible flavor, giving you that coveted artisan taste with practically no effort. It’s incredibly versatile, serving as the perfect companion to soups, stews, or simply slathered with butter. Plus, the sheer joy and accomplishment of pulling a golden, crackling loaf from your own oven is wonderfully satisfying.
Behind the Recipe
What I’ve truly learned making this bread is that patience is key, but it doesn’t have to be complicated. The magic truly happens during that long, slow proof, which develops the flavor and structure without any vigorous kneading. A common pitfall I see is people getting nervous about the wetness of the dough; it’s meant to be quite slack and sticky, so resist the urge to add more flour than specified. That high hydration is what contributes to its open, airy crumb. To elevate it from good to truly great, don’t skimp on preheating your Dutch oven; that initial burst of heat creates a phenomenal crust. A gentle hand when shaping and handling the dough is also crucial—treat it with care to preserve those precious air bubbles.
Shopping Tips
- Flour: While all-purpose flour works beautifully for a lighter crumb, try bread flour for a chewier texture and even more structure. Look for unbleached varieties for the best results.
- Yeast: Active dry yeast or instant yeast will both work, but if using active dry, ensure it’s fresh by testing it in warm water with a pinch of sugar first.
- Salt: Kosher salt or fine sea salt are preferred; avoid iodized table salt, as it can sometimes impart a slightly metallic flavor.
- Bag: Use a sturdy, gallon-sized freezer bag—they are thicker and less likely to tear during the gentle mixing process.
- Dutch Oven: While not strictly necessary, baking in a preheated Dutch oven is the secret to an incredibly crispy crust and perfectly baked interior.
Prep Ahead Ideas
This recipe is practically designed for prepping ahead! You can mix the dough in the bag the night before, or even up to 18 hours in advance, and let it proof slowly in a cool spot or the fridge. Alternatively, measure out all your dry ingredients into the bag ahead of time, then simply add the water and yeast when you’re ready to start the proofing process.
Time-Saving Tricks
If you’re in a hurry and can’t wait for a long overnight proof, use slightly warmer water (around 105-115°F or 40-46°C) and let the dough proof in a warmer spot in your kitchen. This can shorten the proofing time to 4-6 hours, though a longer, colder proof will always yield deeper flavor. Using instant yeast also shaves off the step of proofing the yeast separately.
Common Mistakes
One of the most common mistakes is adding too much flour; the dough is supposed to be very wet and sticky. Resist the urge to “fix” it with more flour, as this will result in a dense, tough loaf. Another pitfall is under-proofed or over-proofed dough; watch for signs like a bubbly surface and increased volume, but avoid letting it go too long until it deflates. Finally, not preheating your Dutch oven adequately can lead to a less crispy crust, so give it at least 30 minutes in the hot oven.
What to Serve It With
This rustic bread is incredible with a hearty minestrone soup, a fragrant beef stew, or a simple bowl of olive oil and balsamic vinegar for dipping. It’s also perfect for making gourmet sandwiches, or toasted and topped with avocado and a sprinkle of flaky sea salt. Don’t forget it’s wonderful simply with butter and your favorite jam for breakfast.
Tips & Mistakes
When serving this bread, be sure to let it cool completely before slicing to ensure the crumb sets properly and doesn’t become gummy. A serrated bread knife will make slicing much easier and preserve the beautiful texture. If you find the crust has softened a bit from storage, a quick 5-10 minute refresh in a hot oven can bring back its crispness.
Storage Tips
Store in airtight containers in the fridge. It reheats beautifully, but if you sneak a bite cold straight from the container, it still works.
Variations and Substitutions
You can easily swap out some of the all-purpose flour for whole wheat (up to 25-30%) for a nuttier flavor and denser crumb, though the classic version with white flour is truly wonderful. For extra flavor, try adding a tablespoon of fresh rosemary or a half cup of shredded sharp cheddar to the dough. A sprinkle of sesame or poppy seeds on top before baking also adds a lovely touch. While other grains can be used, stick to the basic flour-water-yeast-salt ratio for your first few loaves to master the technique, as different flours absorb water differently.
Frequently Asked Questions
BREAD IN A BAG – One of my favorite bread of all time!
Ingredients
Main Ingredients
- 3.5 cups all-purpose flour
- 2 tablespoons granulated sugar
- 1.5 teaspoons salt
- 2.25 teaspoons active dry yeast about one 7 g packet
- 1.25 cups warm water about 105°F to 115°F
- 2 tablespoons vegetable oil
Instructions
Preparation Steps
- In a large resealable plastic bag, add the flour, sugar, salt, and active dry yeast. Seal the bag and shake vigorously to combine the dry ingredients.
- Pour the warm water and vegetable oil into the bag with the dry ingredients. Seal the bag and gently knead and squeeze the mixture through the plastic until a sticky dough forms and the ingredients are evenly hydrated.
- Leave the sealed bag in a warm spot and let the dough rise inside the bag until doubled in size, about 45 to 60 minutes.
- Grease a 9x5-inch loaf pan. Open the bag, transfer the dough into the pan, shape the top gently with damp hands, and cover with a clean towel. Let it rest for 20 to 30 minutes for a short second rise.
- Preheat the oven to 350°F. Bake the loaf for 25 to 30 minutes, or until the top is golden brown and an inserted toothpick comes out clean.
- Remove the bread from the oven and let it cool in the pan for 10 minutes, then transfer to a wire rack to cool completely before slicing.
Notes
Nutrition
Featured Comments
“This weeknight winner recipe was family favorite — the rich really stands out. Thanks!”
“New favorite here — family favorite. tender was spot on.”