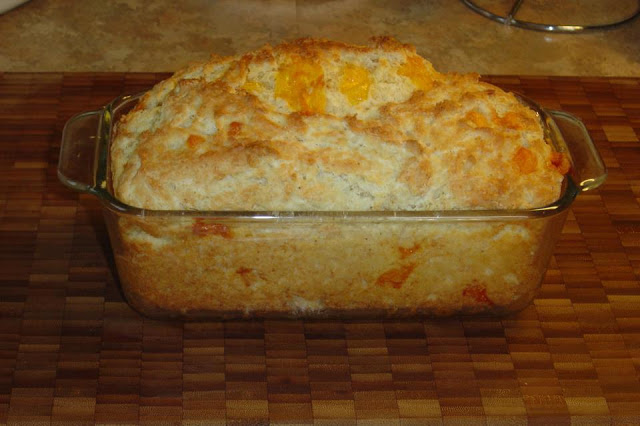
Red Lobster’s Cheese Biscuit (in a loaf)
These are those unbelievably light, flaky, and golden biscuits you dream about, the kind that melt in your mouth and practically demand to be slathered in butter and jam. Forget complicated techniques or long waiting times; this recipe brings the magic of a classic, tender biscuit right into your kitchen with surprising ease. They’re a true game-changer for breakfast, brunch, or even alongside a cozy dinner.
My husband, bless his heart, is a biscuit connoisseur. For years, store-bought biscuits were a weekly grocery item, a convenience I appreciated but never truly loved. One weekend, craving something truly special to go with our homemade chili, I decided to tackle biscuits from scratch. He was skeptical, of course, but as soon as he bit into that first warm, buttery, flaky creation, his eyes lit up. He actually declared, “These are it. We’re never buying biscuits again.” Now, these copycat biscuits have become a cherished tradition in our home, signaling weekend mornings, comforting dinners, and happy, satisfied smiles all around.
You may also like:
Why You’ll Love This these-copycat-biscuits-are-so-easy-to-make-in-just-20-min-and-they-taste-a-million-times-better
- Unbeatable Flakiness: With perfect layers that practically peel apart, these biscuits are the epitome of tender, melt-in-your-mouth goodness.
- Ridiculously Quick: From start to finish, you can have a batch of warm, golden biscuits on your table in under 20 minutes, making them ideal for any last-minute craving.
- Simple Ingredients, Incredible Flavor: You likely already have everything you need in your pantry to whip up these bakery-quality biscuits.
- Versatile Perfection: They’re fantastic with sweet toppings like jam and honey, or as a savory side to stews, gravies, or fried chicken.
- Budget-Friendly Indulgence: Enjoy delicious, fresh-baked goods without the bakery price tag, and they taste a million times better than anything from a can.
- Pure Comfort: There’s something undeniably comforting and deeply satisfying about a warm, homemade biscuit, especially one that comes together so effortlessly.
Behind the Recipe
The secret to truly spectacular biscuits lies in a few simple but crucial details. I’ve learned that keeping your ingredients, especially the butter and buttermilk, as cold as possible is non-negotiable for those incredible flaky layers. The goal isn’t to fully incorporate the butter; you want pea-sized pieces to remain, which then steam in the oven, creating pockets of air. Another game-changer is resisting the urge to overmix the dough. A light hand keeps the biscuits tender, while too much handling develops gluten, leading to a tough texture. And finally, a hot oven is key for a quick rise and that beautiful golden crust. Don’t be afraid to embrace the rustic charm of a slightly uneven biscuit; they’ll still be absolutely delicious.
Shopping Tips
- All-Purpose Flour: Opt for an unbleached all-purpose flour for the best texture and flavor in your biscuits. Make sure it’s fresh and not rancid.
- Unsalted Butter: Always choose high-quality unsalted butter. Keeping it very cold until you’re ready to use it is essential for flaky results.
- Buttermilk: Full-fat buttermilk is ideal for tender biscuits with a slight tang. If you don’t have it, you can easily make your own by adding a tablespoon of lemon juice or white vinegar to regular milk and letting it sit for five minutes.
- Baking Powder: Ensure your baking powder is fresh and active, as this is crucial for the biscuits’ rise. You can test it by adding a teaspoon to a bit of hot water; it should bubble vigorously.
- Salt: A good quality fine sea salt or kosher salt is perfect. It balances the richness and brings out the flavor of the butter.
Prep Ahead Ideas
You can cut your butter into small pieces and place it back in the freezer a day or two before you plan to bake. For a truly speedy morning, you can even mix the dry ingredients (flour, baking powder, salt) together and store them in an airtight container at room temperature. Just remember to keep the butter and buttermilk chilled until mixing time.
Time-Saving Tricks
The fastest way to cut in the cold butter is by using a food processor for a few quick pulses until crumbly, though a pastry blender or even your fingers work well too. Don’t overthink the shaping; a quick pat into a rectangle and simple cuts with a sharp knife or biscuit cutter are all you need. A hot oven means they bake up quickly, so have everything ready to go once the dough is mixed.
Common Mistakes
A common pitfall is using warm butter or buttermilk, which results in flat, dense biscuits. Another is overmixing the dough; handle it as little as possible to maintain tenderness. Not preheating your oven sufficiently can also lead to less rise and a paler crust. Finally, don’t twist your biscuit cutter; press straight down and pull straight up to keep those delicate layers intact.
What to Serve It With
These biscuits are incredibly versatile! They are absolutely divine with a generous smear of butter and your favorite homemade jam or honey. They also make an ideal companion for a hearty beef stew, a bowl of chili, or alongside crispy fried chicken for that ultimate comfort meal. Don’t forget they’re perfect for breakfast sandwiches with eggs and bacon, too!
Tips & Mistakes
Storage Tips
Store in airtight containers in the fridge. It reheats beautifully, but if you sneak a bite cold straight from the container, it still works.
Variations and Substitutions
For a slightly richer flavor, you can swap out a quarter cup of the buttermilk for heavy cream. While buttermilk provides the best tang and tender crumb, you can use regular milk with a tablespoon of lemon juice or white vinegar if you’re in a pinch. You can also add a pinch of sugar for a sweeter biscuit, or herbs like chives or rosemary for a savory twist, but the classic plain buttery biscuit is truly a masterpiece on its own.
Frequently Asked Questions
Red Lobster’s Cheese Biscuit (in a loaf)
Ingredients
Main Ingredients
- 2 cup self-rising flour
- 2 tablespoon granulated sugar
- 0.5 teaspoon salt
- 4 tablespoon unsalted butter, melted plus extra for brushing
- 1 cup milk whole milk preferred
- 0.5 cup sour cream
- 2 cup sharp cheddar cheese, shredded reserve 0.25 cup for topping
- 0.25 cup grated Parmesan cheese
- 2 tablespoon fresh parsley, chopped
- 1 large egg lightly beaten
- 0.5 teaspoon garlic powder
- 0.5 teaspoon onion powder
Instructions
Preparation Steps
- Preheat the oven to 350°F (175°C). Grease a 9x5 inch loaf pan or line it with parchment paper.
- In a large bowl, whisk together the self-rising flour, sugar, salt, garlic powder, and onion powder until evenly combined.
- In a separate bowl, mix the melted butter, milk, sour cream, and beaten egg until smooth.
- Pour the wet ingredients into the dry ingredients and stir gently until just combined. Do not overmix.
- Fold in the shredded cheddar, Parmesan, and chopped parsley, reserving a little cheddar for the top.
- Spoon the batter into the prepared loaf pan and smooth the top. Sprinkle the reserved cheddar evenly over the surface and brush lightly with a little melted butter.
- Bake in the preheated oven for 30 to 40 minutes, or until the top is golden brown and a toothpick inserted in the center comes out clean.
- Allow the loaf to cool in the pan for 10 minutes, then transfer to a wire rack. Slice into 8 pieces and serve warm.
Notes
Nutrition
Featured Comments
“This crowd-pleaser recipe was family favorite — the cheesy really stands out. Thanks!”
“New favorite here — so flavorful. hearty was spot on.”