The Outback Steakhouse Blooming Onion
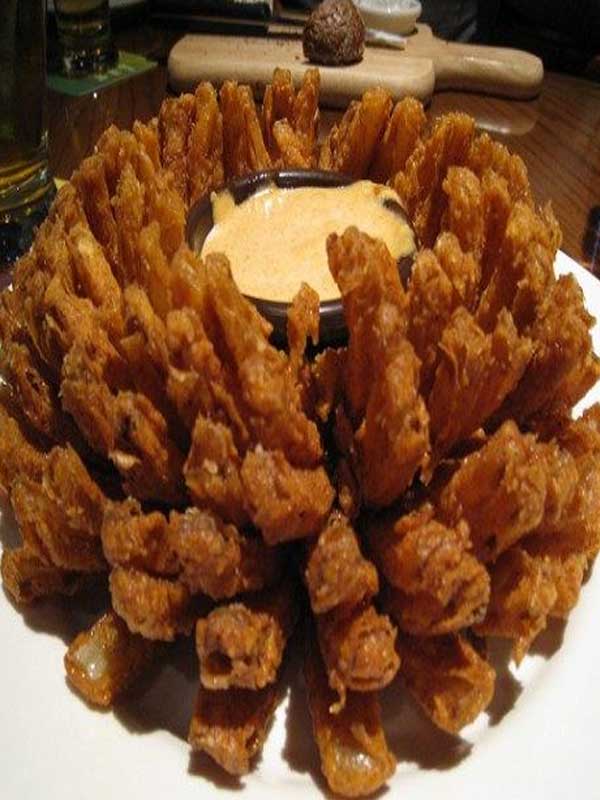
Oh, the blooming onion! If there’s one appetizer that consistently makes an entrance, it’s this magnificent, golden-fried spectacle. Imagine a colossal onion, expertly cut into petals that splay open like a beautiful flower, all coated in a crispy, seasoned batter, and then deep-fried to a perfect golden brown. Served with a zesty, creamy dipping sauce, it’s a showstopper that’s undeniably fun to eat and surprisingly satisfying. It’s the kind of dish that turns an ordinary meal into an occasion, promising a delightful crunch and a burst of savory flavor with every pull-apart petal.
My husband, Mark, absolutely adores this recipe. We first tried making it at home a few years ago on a whim, after craving our favorite steakhouse appetizer but not wanting to leave the house. We spent an evening in the kitchen, him carefully slicing the onion and me whisking the batter, and the aroma filling our home was intoxicating. When we finally pulled that golden, blooming beauty from the fryer, we both just stared in awe. It quickly became our go-to for movie nights, game day get-togethers, and frankly, any time we needed a little culinary pick-me-up. It’s truly a labor of love, but the joy and deliciousness it brings to our table make every single step worth it.
You may also like:
Why You’ll Love This the-outback-steakhouse-blooming-onion
This is more than just an appetizer; it’s an experience. You’ll find yourself drawn to its incredible flavor and the sheer fun of pulling apart each crispy petal.
- Impressive Presentation: It’s a guaranteed conversation starter! The “bloomed” effect is visually stunning and always gets an “ooh” or an “ahh” when it hits the table.
- Unforgettable Flavor: The onion itself mellows and sweetens slightly with frying, encased in a perfectly seasoned, crispy batter that’s utterly addictive, especially with the zesty dipping sauce.
- Perfect for Sharing: It’s designed for communal enjoyment, making it ideal for parties, family gatherings, or just a fun night in with friends. Everyone loves to grab their own piece!
- Deep-Fried Deliciousness: Sometimes you just need that golden, crispy, deep-fried indulgence, and this recipe delivers on all fronts without being overly heavy.
- Better Than the Restaurant: Making it at home allows you to control the freshness of ingredients, the seasoning of the batter, and the temperature of the oil, often resulting in a superior, less greasy, and more flavorful blooming onion.
Behind the Recipe
Creating the perfect blooming onion is a wonderful lesson in patience and technique, and it’s certainly taught me a few things. The biggest learning curve for many is the initial cut of the onion. The goal is to slice deeply enough to create distinct petals without cutting all the way through the root, which holds the whole thing together. I’ve found that using a really sharp knife and a steady hand, or even a specialized blooming onion cutter, makes all the difference. Don’t rush this step! Another crucial element is getting your batter consistency just right – too thin and it won’t coat, too thick and it can become gummy. I’ve learned that a quick double-dip (first in a wet batter, then dry, then wet again) helps ensure every nook and cranny is coated. And, of course, the oil temperature is paramount; too low and you get a greasy onion, too high and the outside burns before the inside cooks through. The small touches that really elevate it are seasoning the onion immediately after it comes out of the hot oil, and serving it with a truly exceptional, homemade dipping sauce.
Shopping Tips
- Onions: Look for large, firm, unblemished sweet onions, such as a Vidalia or Walla Walla. They tend to be less pungent and caramelize beautifully when fried. Avoid any onions with soft spots or sprouts.
- All-Purpose Flour: You’ll need a good quantity of all-purpose flour for the batter. There’s no need for anything fancy here; a standard brand will work perfectly to achieve that crisp coating.
- Spices: Ensure your spices like paprika, garlic powder, onion powder, and cayenne pepper are fresh. Older spices lose their potency and won’t give the batter the vibrant flavor it deserves.
- Frying Oil: Choose a neutral oil with a high smoke point, such as vegetable oil, canola oil, peanut oil, or sunflower oil. You’ll need enough to submerge the onion completely, so plan accordingly.
- Dipping Sauce Ingredients: For the classic dipping sauce, grab some good quality mayonnaise, horseradish (freshly grated if you’re feeling ambitious, but jarred works well), ketchup, and a dash of Worcestershire sauce.
Prep Ahead Ideas
You can definitely get a head start on some components. The onion can be cut and then stored submerged in ice water in the fridge for a few hours, which helps it crisp up. You can also mix all your dry batter ingredients in advance and store them in an airtight container. The dipping sauce is another perfect make-ahead item; in fact, its flavors often meld and deepen even more after a few hours or overnight in the refrigerator.
Time-Saving Tricks
While making a blooming onion is a bit of a project, a few shortcuts can help. If you’re nervous about cutting the onion, consider investing in a specialty blooming onion cutter; they make the job quick and precise. Have all your dredging stations set up before you even start cutting the onion—wet batter, dry flour, then a second wet batter—to create an efficient assembly line. Lastly, using a deep-fryer with a temperature gauge takes the guesswork out of maintaining the perfect oil temperature.
Common Mistakes
One of the most common mistakes is not cutting the onion properly; if you cut through the root, the petals will detach and fall apart in the oil. Another pitfall is having the oil at the wrong temperature—if it’s too cool, the onion will absorb too much oil and become greasy; if it’s too hot, the batter will burn before the onion cooks. Overcrowding the fryer is also a no-no, as it drops the oil temperature significantly. Lastly, not seasoning the onion immediately after frying can lead to a bland exterior; the salt adheres best when the oil is still hot.
What to Serve It With
The blooming onion is a fantastic appetizer on its own, especially with its signature dipping sauce. It pairs wonderfully with other classic American comfort foods like burgers, ribs, or grilled steaks. You could also serve it alongside other fun appetizers like chicken wings or loaded potato skins for a full game-day spread.
Tips & Mistakes
Storage Tips
Store in airtight containers in the fridge. It reheats beautifully, but if you sneak a bite cold straight from the container, it still works.
Variations and Substitutions
While the classic blooming onion is perfection, you can certainly play around with the flavors. For a gluten-free version, swap out the all-purpose flour for a good quality gluten-free all-purpose blend. You could also experiment with the seasoning in the batter, adding a touch of smoked paprika for depth, extra cayenne for more heat, or even some dried herbs like oregano. For the dipping sauce, feel free to customize it with a different hot sauce, a squeeze of fresh lemon juice, or even a touch of honey for a sweet and savory kick. While an air fryer version might not achieve the same deep-fried crispness, you can try it for a lighter take, though it will likely require more oil spray and careful flipping. However, for that true steakhouse experience, the deep-fried classic is absolutely worth sticking with.
Frequently Asked Questions
The Outback Steakhouse Blooming Onion
Ingredients
Main Ingredients
- 1 item large yellow or sweet onion about 10–12 oz, choose a firm onion
- 1.5 cups all-purpose flour
- 0.75 cups cornstarch helps crisp the coating
- 1 cup panko breadcrumbs for extra crunch
- 1 item large egg
- 0.5 cup milk whole or 2% milk
- 2 teaspoons paprika
- 1 teaspoons garlic powder
- 1 teaspoons onion powder
- 0.5 teaspoons cayenne pepper adjust to taste
- 1.5 teaspoons salt
- 1 teaspoons black pepper freshly ground preferred
- 4 cups vegetable oil for deep frying; use oil with a high smoke point
Instructions
Preparation Steps
- Peel the onion and cut off the top (stem end), leaving the root intact. Turn the onion cut-side down and make 12–16 vertical cuts from top toward the root, stopping about 1/2 inch from the root so the petals stay connected.
- Carefully turn the onion over and spread the petals apart to form a 'bloom.' Chill the cut onion in the refrigerator for 10–15 minutes to help it hold its shape.
- In a shallow bowl, whisk the egg and milk together to make the wet batter.
- In a separate bowl, combine the flour, cornstarch, paprika, garlic powder, onion powder, cayenne, salt, and black pepper. Mix well.
- Dredge the chilled onion in the seasoned flour mixture, making sure to get the flour between the petals. Shake off excess flour.
- Dip the floured onion into the egg-and-milk mixture, coating thoroughly, then press into the panko breadcrumbs so the crumbs adhere to all petals.
- Place the breaded onion back in the refrigerator for 10 minutes to set the coating while heating the oil.
- Heat the oil in a deep pot or fryer to 350°F (175°C). Carefully lower the onion into the hot oil, cut-side down, and fry for 3–5 minutes until the coating is golden brown. Flip and fry an additional 2–3 minutes if needed to cook through.
- Remove the onion from the oil and drain on a wire rack or paper towels. Let rest for a minute, then serve immediately with your favorite dipping sauce.
Notes
Nutrition
Featured Comments
“Made this last night and it was absolutely loved. Loved how the comforting came together.”
“Super easy and turned out amazing! My family asked for seconds. Saving this one.”