OLD-FASHIONED SOFT AND BUTTERY YEAST ROLLS
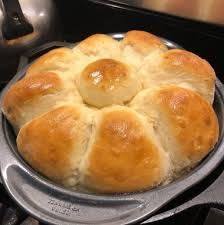
There’s a simple, undeniable comfort that comes from a warm, homemade yeast roll, still tender from the oven, with a whisper of butter melting into its soft interior. These old-fashioned soft and buttery yeast rolls are exactly that – a return to classic, wholesome baking that delivers pure, unadulterated delight. They’re pillowy, rich, and incredibly satisfying, proving that sometimes, the simplest things truly are the best. If you’re looking to bring a touch of heartwarming goodness to your table, this recipe is an absolute must-try.
My husband, Mark, absolutely adores these rolls. For years, I struggled to find a yeast roll recipe that consistently delivered that perfect balance of fluffiness and rich, buttery flavor, until I landed on this one. Now, it’s a non-negotiable for almost every holiday meal and often makes an appearance at our Sunday suppers. I still remember the first time I nailed it; the kitchen smelled incredible, and Mark walked in, took one look at the golden, plump rolls cooling on the rack, and his eyes just lit up. He actually snuck one right off the baking sheet, still warm, and declared it “the best roll he’d ever had.” That moment truly cemented its place as a staple in our home, a delicious symbol of comfort and togetherness.
You may also like:
Why You’ll Love This old-fashioned-soft-and-buttery-yeast-rolls-3
You’ll fall in love with these Old-Fashioned Soft and Buttery Yeast Rolls because they strike that perfect balance between airy lightness and a satisfying chew, making them utterly irresistible.
The rich, buttery flavor isn’t just a whisper; it’s a pronounced, comforting taste that elevates any meal, from a simple soup to a festive holiday spread.
While they deliver exceptional results, the process is surprisingly forgiving and enjoyable, making it a rewarding bake even for those new to working with yeast.
They are incredibly versatile, serving beautifully as a dinner roll, a base for mini sliders, or even toasted for breakfast.
The aroma that fills your kitchen while these bake is pure nostalgia and warmth, creating an inviting atmosphere that sets the tone for a wonderful meal.
This recipe consistently produces beautifully golden, uniform rolls that are sure to impress both family and guests alike.
Behind the Recipe
What I’ve learned from making these rolls countless times is that patience truly is a virtue, especially when it comes to proofing. Don’t rush the rise; let the dough take its time to double in size in a warm, cozy spot, and you’ll be rewarded with an incredibly tender texture. A common pitfall can be over-flouring the dough during kneading, which leads to tough rolls, so resist the urge to add too much. The small touches that elevate these rolls are surprisingly simple: using good quality butter makes a noticeable difference in richness, and a quick brush with melted butter right after they come out of the oven gives them that irresistible sheen and enhances their flavor. Also, ensuring your milk is warmed just right—not too hot, not too cold—is key for happy yeast.
Shopping Tips
- All-Purpose Flour: Opt for unbleached all-purpose flour if possible. It provides a consistent texture and is generally what most home bakers have on hand, giving these rolls their classic structure.
- Active Dry Yeast: Always check the expiration date on your yeast packet or jar. Fresh yeast is crucial for a good rise, and old yeast is the most common culprit for dense rolls.
- Unsalted Butter: Using unsalted butter allows you to control the overall salt content in your rolls. High-quality butter will lend a superior flavor and richness that’s truly noticeable.
- Whole Milk: Whole milk provides the best richness and tenderness for these rolls. While other milks can work, whole milk contributes significantly to the melt-in-your-mouth texture.
- Granulated Sugar: A standard granulated sugar is perfect for this recipe. It feeds the yeast and contributes to the golden-brown crust and subtle sweetness without overpowering the butter flavor.
- Large Eggs: Ensure your eggs are at room temperature, as this helps them incorporate more smoothly into the dough and contributes to a more uniform texture.
Prep Ahead Ideas
You can prepare the dough for these rolls the day before. After the first rise, punch down the dough, shape the rolls, and arrange them in your baking pan. Cover the pan tightly with plastic wrap and refrigerate overnight. In the morning, simply pull them out about an hour before baking to allow them to come to room temperature and proof for their second rise.
Time-Saving Tricks
A stand mixer with a dough hook will significantly cut down on kneading time, making the process much less strenuous. If you’re short on time for the second rise, you can create a warm environment by placing the covered rolls in a slightly warm (but turned off) oven for a quicker proof.
Common Mistakes
One of the most common mistakes is using water that’s too hot or too cold for the yeast; too hot will kill it, too cold won’t activate it. Aim for lukewarm, around 105-115°F (40-46°C). Another pitfall is not kneading enough or over-kneading; look for a smooth, elastic dough that passes the windowpane test (stretching a small piece thin enough to see light through it without tearing). Lastly, under-baking can lead to gummy rolls, so ensure they are golden brown and sound hollow when tapped.
What to Serve It With
These soft and buttery yeast rolls are incredibly versatile. They’re perfect alongside a hearty pot roast, a comforting chicken noodle soup, or a fresh garden salad. They also make an excellent accompaniment to any holiday feast, soaking up gravy beautifully, or sliced for delicate sliders with leftover turkey.
Tips & Mistakes
Storage Tips
Store in airtight containers in the fridge. It reheats beautifully, but if you sneak a bite cold straight from the container, it still works.
Variations and Substitutions
While the classic buttery version is truly exceptional, you could add a hint of garlic powder and dried parsley to the dough for savory garlic rolls. For a slightly sweeter touch, a teaspoon of cinnamon can be added. If you need a dairy-free option, you can substitute plant-based milk and a good quality dairy-free butter substitute, though the classic’s richness is hard to beat.
Frequently Asked Questions
OLD-FASHIONED SOFT AND BUTTERY YEAST ROLLS
Ingredients
Main Ingredients
- 4 cup all-purpose flour Spoon and level for accuracy
- 0.25 cup granulated sugar
- 1 teaspoon salt
- 2.25 teaspoon active dry yeast One 7g packet
- 1.25 cup whole milk Warm to about 105-110°F
- 4 tablespoon unsalted butter Melted (plus additional for brushing)
- 1 whole large egg Room temperature
- 2 tablespoon unsalted butter Melted, for brushing after baking
Instructions
Preparation Steps
- In a small bowl, whisk the warm milk and sugar until the sugar dissolves; sprinkle the active dry yeast over the milk and let sit 5 to 10 minutes until foamy.
- In a large mixing bowl, combine 2 cups of the flour and the salt. Add the melted butter and the egg, then pour in the activated yeast mixture and stir until incorporated.
- Gradually add the remaining flour, 1/2 cup at a time, stirring until a soft dough forms and pulls away from the sides of the bowl.
- Turn the dough out onto a lightly floured surface and knead for 6 to 8 minutes until smooth and elastic. Add a little extra flour if the dough is too sticky.
- Place the kneaded dough in a lightly greased bowl, cover with plastic wrap or a clean kitchen towel, and let rise in a warm draft-free place until doubled in size, about 60 to 75 minutes.
- Punch down the risen dough and divide into 12 equal pieces. Shape each piece into a smooth ball and place them in a greased 9x13-inch baking pan, spaced slightly apart.
- Cover the pan and let the rolls rise a second time until puffy and nearly doubled, about 30 to 40 minutes.
- Preheat the oven to 375°F (190°C). Bake the rolls on the center rack for 12 to 15 minutes or until golden brown on top.
- Remove the rolls from the oven and immediately brush the tops with the additional melted butter. Let cool slightly before serving warm.
Notes
Nutrition
Featured Comments
“This crunchy recipe was absolutely loved — the vibrant really stands out. Thanks!”
“This sweet treat recipe was so flavorful — the perfectly seasoned really stands out. Thanks!”