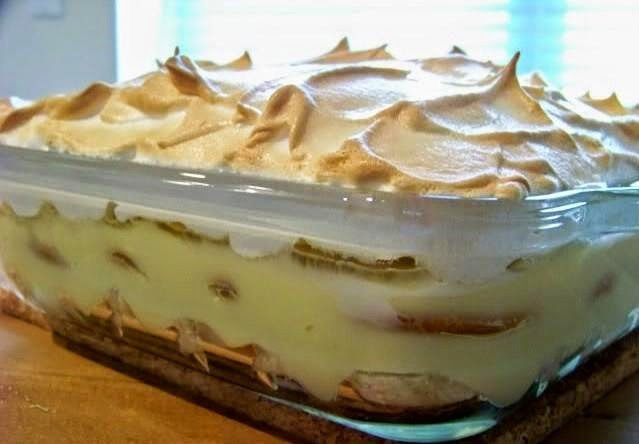
OLD FASHIONED BANANA PUDDING
There’s something uniquely comforting about a classic old-fashioned banana pudding. It’s more than just a dessert; it’s a taste of nostalgia, a sweet symphony of creamy custard, ripe bananas, and delicate vanilla wafers that soak up all that delightful goodness. This isn’t a fussy, over-the-top treat; it’s a humble masterpiece, perfect for any occasion when you need a little warmth and sweetness in your life.
This dessert holds such a special place in our home. My husband, bless his heart, isn’t always one for overly sweet things, but one bite of this banana pudding, and he’s transported back to his grandmother’s kitchen. I remember the first time I made it for him – a particularly rough week where everything felt a bit upside down. I just wanted to create a moment of simple joy. Watching his face light up with that first spoonful, the way he instantly relaxed, I knew this wasn’t just dessert; it was a hug in a bowl. Now, it’s our go-to for Sunday dinners, potlucks, and any time we need a little dose of pure, unadulterated happiness. Our little one also adores helping layer the wafers, making it a true family affair.
You may also like:
Why You’ll Love This old-fashioned-banana-pudding
This recipe brings pure comfort in every bite, offering that sweet, creamy taste you remember from childhood.
It’s surprisingly easy to assemble, making it perfect for a weeknight treat or a relaxed weekend dessert.
The no-bake custard preparation means less time hovering over a hot oven and more time enjoying the process.
It’s a fantastic make-ahead option, actually tasting better once the flavors have had a chance to meld overnight.
This pudding is a guaranteed crowd-pleaser, delighting both kids and adults with its familiar, satisfying layers.
Behind the Recipe
Making banana pudding has taught me the quiet art of patience, especially when it comes to the custard. The biggest lesson I’ve learned is to never rush the custard-making process; low and slow heat is your best friend to avoid scrambled eggs and achieve that velvety smoothness. Another game-changer for me was understanding banana ripeness – you want them yellow with a few brown flecks, sweet but still firm enough to hold their shape. And while the original Nilla wafers are iconic, don’t underestimate the power of a good quality vanilla extract and full-fat dairy for a truly rich flavor. The small touches, like arranging the wafers artfully or a final sprinkle of crushed wafers, really elevate it from simple to sublime.
Shopping Tips
- Bananas: Look for ripe, yellow bananas with a few small brown spots. They should be sweet but still firm, not mushy, as overly ripe bananas can make the pudding watery.
- Vanilla Wafers: While classic Nilla wafers are traditional, any good quality, crisp vanilla wafer or even shortbread cookies will work beautifully. Check the expiration date for freshness.
- Dairy: Opt for full-fat milk and cream for the richest, most decadent custard. Skim milk or low-fat alternatives might result in a thinner, less satisfying pudding.
- Eggs: Fresh, large eggs are essential for the custard base. Check that they are clean and free of cracks before purchasing.
- Vanilla Extract: Invest in a good quality pure vanilla extract, not imitation. The pure vanilla really shines through in the custard and makes a noticeable difference in flavor.
- Sugar: Granulated sugar is what you’ll need for sweetening the custard. Ensure you have enough on hand, as precise measurements are key for balance.
Prep Ahead Ideas
The custard can be made up to two days in advance and stored in an airtight container in the fridge. Just give it a good whisk before layering.
You can slice your bananas a few hours ahead and toss them with a tiny bit of lemon juice to prevent browning, though it’s best to layer them closer to assembly.
Have your vanilla wafers ready to go in a bowl so they’re easily accessible when you’re ready to build the pudding.
Time-Saving Tricks
If you’re really pressed for time, a good quality store-bought vanilla pudding can be used as a shortcut for the custard, though the homemade version is always superior.
Use a hand mixer or stand mixer with a whisk attachment for quickly whipping the cream for topping, saving your arm muscles.
Instead of meticulously layering each banana slice, you can simply scatter them between wafer and custard layers for a more rustic, quicker assembly.
Common Mistakes
One common pitfall is scorching the custard; always stir constantly over medium-low heat. If it starts to thicken too quickly, remove it from the heat briefly.
Using underripe or overripe bananas can drastically change the texture and flavor; aim for ripe but still firm.
Not allowing the pudding to chill long enough results in runny custard and hard wafers; give it at least 4-6 hours, or ideally overnight, for the best results.
What to Serve It With
This banana pudding is a complete dessert on its own, but a simple dollop of freshly whipped cream or a light dusting of cinnamon can be lovely. It also pairs wonderfully with a cup of coffee or a glass of cold milk. For a true Southern feast, serve it after a comforting meal like fried chicken, collard greens, and mashed potatoes.
Tips & Mistakes
Storage Tips
Store in airtight containers in the fridge. It reheats beautifully, but if you sneak a bite cold straight from the container, it still works.
Variations and Substitutions
While the classic vanilla wafer is king here, feel free to experiment with shortbread cookies or even graham crackers for a different texture. For a richer custard, you can increase the number of egg yolks slightly, but be mindful of the consistency. Some people like to add a touch of rum or banana liqueur to the custard for an adult twist, though the traditional version is truly perfect as is.
Frequently Asked Questions
OLD FASHIONED BANANA PUDDING
Ingredients
Main Ingredients
- 3 cup vanilla wafers lightly crushed
- 5 large bananas ripe, sliced
- 3 cup whole milk
- 1 cup granulated sugar
- 0.25 cup cornstarch for thickening
- 4 large egg yolks beaten
- 2 tablespoon unsalted butter cut into pieces
- 2 teaspoon vanilla extract
- 2 cup heavy whipping cream for whipped cream
- 0.25 cup powdered sugar for whipped cream
Instructions
Preparation Steps
- In a medium saucepan, whisk together the granulated sugar and cornstarch. Slowly whisk in the milk until smooth.
- Place the saucepan over medium heat and cook, stirring constantly, until the mixture thickens and begins to simmer, about 6 to 8 minutes.
- Temper the beaten egg yolks by whisking a small amount of the hot milk mixture into the yolks, then return the yolk mixture to the saucepan. Cook 1 to 2 minutes more, stirring, until very thick.
- Remove from heat and stir in the butter and vanilla extract until smooth. Let the pudding cool slightly.
- In a large bowl, whip the heavy cream with the powdered sugar until soft peaks form. Reserve a dollop for topping if desired.
- Assemble the pudding in a 9x13 dish or individual glasses: spread a layer of vanilla wafers on the bottom, top with a layer of banana slices, then spread a layer of warm pudding. Repeat layers, finishing with pudding on top.
- Top with whipped cream and additional vanilla wafers or banana slices for garnish.
- Cover and chill the assembled pudding for at least 2 hours before serving so the wafers soften slightly and flavors meld.
Notes
Featured Comments
“Made this last night and it was family favorite. Loved how the sweet treat came together.”
“New favorite here — family favorite. creamy was spot on.”