NO-BAKE CREAM CHEESE PEANUT BUTTER PIE WITH CHOCOLATE WHIPPED CREAM
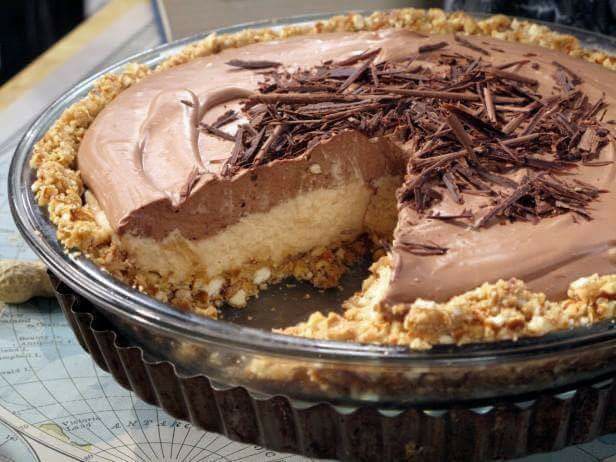
This no-bake cream cheese peanut butter pie is a true dessert hero in our home. It’s a luscious combination of rich, creamy peanut butter filling, a subtle tang from the cream cheese base, all nestled in a buttery graham cracker crust, and crowned with a light, airy chocolate whipped cream. It’s the kind of treat that looks impressive but comes together with minimal effort, making it perfect for any occasion when you need a crowd-pleasing dessert that doesn’t require turning on the oven.
My husband, bless his heart, is a true peanut butter fanatic. For years, his birthday request was always some variation of a peanut butter dessert, usually involving a lot of baking. One sweltering summer, I decided to simplify things and tried my hand at a no-bake version. The first slice of this pie, with its creamy peanut butter and a generous dollop of homemade chocolate whipped cream, disappeared from his plate in record time. It quickly became our go-to for potlucks, family dinners, and honestly, just a regular Tuesday evening treat because it’s so straightforward to whip up. It’s the kind of dessert that feels indulgent but comes together with minimal fuss, making it a true staple in our home.
You may also like:
Why You’ll Love This no-bake-cream-cheese-peanut-butter-pie-with-chocolate-whipped-cream
- Effortless Elegance: No oven required! This pie comes together beautifully with simple mixing and chilling, making it perfect for hot days or when you want a showstopper dessert without the fuss.
- Irresistible Flavor Combination: The rich, savory notes of peanut butter are perfectly balanced by the subtle tang of cream cheese and the decadent sweetness of homemade chocolate whipped cream. It’s a flavor party in every bite.
- Make-Ahead Magic: You can assemble this pie a day or two in advance, allowing the flavors to meld and the filling to firm up perfectly, freeing up your time on the day you plan to serve it.
- Crowd-Pleasing Power: From kids to adults, the combination of peanut butter and chocolate is a universal favorite, guaranteeing smiles and requests for the recipe.
- Customizable Comfort: While fantastic as is, it’s also wonderfully adaptable! A sprinkle of chopped peanuts, a drizzle of chocolate syrup, or even a different flavored whipped cream can make it uniquely yours.
Behind the Recipe
One thing I’ve learned making this pie countless times is that patience with chilling is your best friend. It’s tempting to cut into it early, but that solid two to four hours (or even overnight!) in the fridge truly makes all the difference in achieving that perfectly sliceable, firm texture. Another small touch that elevates it significantly is using good quality peanut butter – not the natural, oil-separated kind, but a smooth, creamy, stir-well variety that holds its structure. And for the chocolate whipped cream, don’t skimp on whipping until you get stiff peaks; that airy texture is key to balancing the richness of the filling.
Shopping Tips
- Cream Cheese: Opt for full-fat block cream cheese, not the spreadable kind in a tub. The higher fat content is crucial for the pie’s firm texture and rich flavor.
- Peanut Butter: Choose a smooth, creamy processed peanut butter (like Jif or Skippy), not natural peanut butter, as the oils in natural varieties can make the filling too loose.
- Heavy Cream: Look for heavy whipping cream with at least 36% milk fat. This ensures it will whip up beautifully and hold its shape for the chocolate topping.
- Confectioners’ Sugar: Also known as powdered sugar, this dissolves smoothly into both the filling and the whipped cream, preventing a gritty texture.
- Graham Crackers: For the crust, a classic honey graham cracker works wonderfully. You can buy pre-crushed crumbs for convenience or crush whole crackers yourself.
- Unsalted Butter: Essential for the crust, unsalted butter gives you control over the overall saltiness of the pie.
Prep Ahead Ideas
This pie is a superstar for make-ahead desserts. You can assemble the entire pie, crust and filling included, up to 2 days in advance. Just cover it loosely with plastic wrap once it’s completely chilled and store it in the refrigerator. Wait to add the chocolate whipped cream topping until an hour or two before serving for the freshest, lightest texture.
Time-Saving Tricks
To speed things up, buy pre-made graham cracker crumbs for the crust instead of crushing whole crackers. Also, ensure your cream cheese is softened to room temperature well in advance; this will make it much easier to beat smooth without lumps, saving you mixing time. If you’re really pressed for time, a store-bought chocolate whipped topping can be used in a pinch, though the homemade version is truly worth the extra few minutes.
Common Mistakes
One frequent pitfall is not allowing the cream cheese and peanut butter to soften sufficiently. If they’re cold, your filling will be lumpy and difficult to spread. Another common mistake is not chilling the pie long enough; a rushed chill can lead to a runny, messy slice. Resist the urge to cut it prematurely! Lastly, over-whipping the heavy cream can turn it grainy, while under-whipping results in a loose topping that won’t hold its shape. Watch it carefully and stop as soon as stiff peaks form.
What to Serve It With
This rich, creamy pie is fantastic on its own. A simple dusting of cocoa powder, a few chopped roasted peanuts, or a light drizzle of chocolate syrup are perfect garnishes. For a little something extra, consider serving small slices alongside a strong cup of coffee or a chilled glass of milk.
Tips & Mistakes
Storage Tips
Store in airtight containers in the fridge. It reheats beautifully, but if you sneak a bite cold straight from the container, it still works.
Variations and Substitutions
While the classic no-bake-cream-cheese-peanut-butter-pie-with-chocolate-whipped-cream is truly iconic for a reason, you can absolutely play with it. For the crust, try a chocolate cookie crumb crust instead of graham crackers for an even deeper chocolate flavor. If you’re not a fan of chocolate whipped cream, a plain sweetened whipped cream or even a peanut butter drizzle would be delicious. You could also swirl in some caramel sauce into the peanut butter filling for a salted caramel twist, just be mindful it might make the filling slightly softer.
Frequently Asked Questions
NO-BAKE CREAM CHEESE PEANUT BUTTER PIE WITH CHOCOLATE WHIPPED CREAM
Ingredients
Main Ingredients
- 1.5 cup graham cracker crumbs
- 2 tablespoon granulated sugar
- 6 tablespoon unsalted butter, melted
- 8 ounce cream cheese, softened
- 1 cup powdered sugar
- 1 cup creamy peanut butter
- 1 teaspoon vanilla extract
- 1 cup heavy cream (for filling) cold
- 1 cup heavy cream (for chocolate whipped cream) cold
- 2 tablespoon unsweetened cocoa powder for whipped cream
- 2 tablespoon powdered sugar (for whipped cream)
- 0.25 cup chopped peanuts for topping
Instructions
Preparation Steps
- Make the crust: In a medium bowl combine graham cracker crumbs and granulated sugar. Stir in melted butter until the mixture is evenly moistened. Press the crumbs firmly into the bottom and up the sides of a 9-inch pie dish to form an even crust. Refrigerate while you prepare the filling.
- Prepare the filling: In a large bowl, beat the softened cream cheese until smooth. Add powdered sugar and continue to beat until fully incorporated. Add the peanut butter and vanilla extract and beat until creamy and smooth.
- Whip the cream: In a separate chilled bowl, whip 1 cup cold heavy cream to soft peaks. Gently fold the whipped cream into the peanut butter-cream cheese mixture until well combined and lightened.
- Assemble the pie: Spoon the peanut butter filling into the prepared crust and smooth the top with a spatula. Cover and refrigerate the pie for at least 2 hours to set (overnight is best for cleaner slices).
- Make the chocolate whipped cream: Just before serving, whip the remaining 1 cup cold heavy cream with the cocoa powder and 2 tablespoons powdered sugar until firm peaks form. Spoon or pipe the chocolate whipped cream over the chilled pie and sprinkle with chopped peanuts.
- Serve and store: Slice and serve chilled. Store any leftovers covered in the refrigerator for up to 3 days.
Notes
Featured Comments
“New favorite here — absolutely loved. cheesy was spot on.”
“Impressed! Clear steps and so flavorful results. Perfect for busy nights.”