No Bake Chocolate Oat Bars
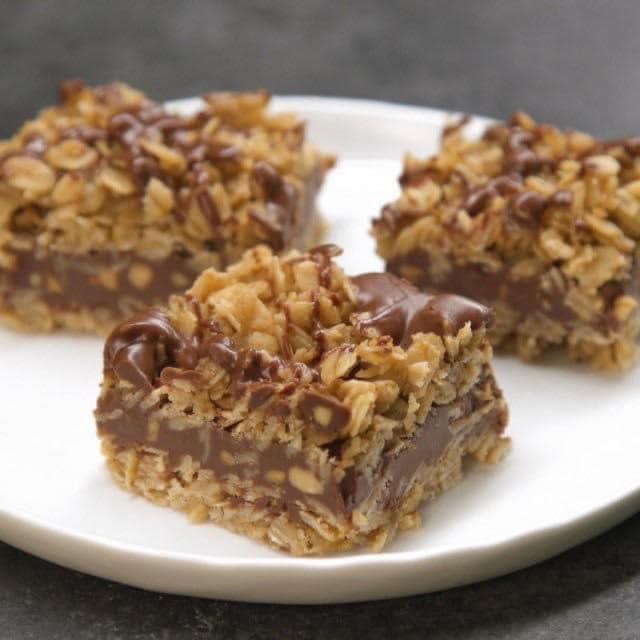
There’s something uniquely satisfying about a treat that comes together with minimal fuss, especially when it involves chocolate and oats. These no-bake chocolate oat bars are exactly that: a simple, wholesome-feeling indulgence that skips the oven entirely. They deliver a delightful chewiness from the oats, a rich depth from the cocoa, and a comforting sweetness that makes them utterly irresistible. If you’re looking for a quick pick-me-up, a lunchbox staple, or a crowd-pleasing dessert that won’t heat up your kitchen, you’ve stumbled upon a true gem.
My husband, bless his heart, is a man of simple pleasures, and these bars quickly claimed a top spot on his “favorite treats” list. I remember the first time I made them – a hot summer afternoon, and the thought of turning on the oven was just unbearable. I whipped up a batch, pressed them into a pan, and tucked them into the fridge. Later that evening, after dinner, he bit into one, and his eyes lit up. “These are amazing!” he declared, “And you didn’t even bake them?” From that moment on, they became a constant request, a little reward after a long day, or a quick energy boost before a weekend project. They’re a testament to how simple ingredients can create something truly memorable and deeply loved in our home.
You may also like:
Why You’ll Love This no-bake-chocolate-oat-bars
These bars are a dream for anyone craving a homemade treat without the fuss of baking.
They come together incredibly quickly, perfect for spontaneous dessert cravings or last-minute additions to a potluck.
The combination of chewy oats and rich chocolate is both comforting and satisfying, a classic pairing everyone adores.
They use common pantry staples, meaning you likely have everything you need on hand right now.
Their no-bake nature makes them ideal for hot weather or when you simply don’t want to use your oven.
They’re wonderfully portable, making them excellent for lunchboxes, picnics, or an on-the-go snack.
Behind the Recipe
What I’ve learned over the years with these bars is that while they’re incredibly simple, a few small details can make all the difference. The most common pitfall I see is not getting the base mixture to the right consistency before adding the oats – you want it fully melted and smooth, but not scorched. Stirring constantly over medium heat is key to preventing burning and ensuring everything emulsifies beautifully. Another tip for success is choosing good quality ingredients; a rich cocoa powder truly elevates the chocolate flavor, and pure vanilla extract adds a layer of warmth you just can’t replicate with imitation. And finally, patience during the chilling phase is crucial. Don’t rush it; a fully set bar is a happy bar, easy to cut and a joy to eat.
Shopping Tips
- Oats: Opt for old-fashioned rolled oats for the best chewy texture. Quick oats can become too mushy, and steel-cut oats won’t work in this recipe.
- Cocoa Powder: Invest in a good quality unsweetened cocoa powder for a deep, rich chocolate flavor that truly shines through. Dutch-processed cocoa works beautifully here too.
- Butter: Use unsalted butter so you can control the overall saltiness of your bars. If you only have salted, just reduce any added salt slightly.
- Granulated Sugar: Standard white granulated sugar provides the necessary sweetness and helps with the texture and binding of the bars.
- Vanilla Extract: Pure vanilla extract is always preferred for its complex and aromatic flavor, which complements the chocolate and oats wonderfully.
- Nut Butter (Optional): If you plan on making a peanut butter version, choose a natural, creamy peanut butter for the best consistency and flavor.
Prep Ahead Ideas
You can measure out all your dry ingredients (oats, cocoa powder, sugar, salt) into a bowl the night before. This makes assembly the next day a breeze – just melt your wet ingredients and combine.
Time-Saving Tricks
To speed up the melting process for the butter, milk, and cocoa mixture, you can carefully do it in the microwave, stirring in 30-second intervals until smooth. Just be sure not to overheat. For quicker setting, place the pan in the freezer for 15-20 minutes after it’s initially cooled down, before transferring to the fridge.
Common Mistakes
One common mistake is using quick oats instead of old-fashioned rolled oats, which can lead to a softer, less desirable texture. Another pitfall is not allowing the base mixture to come to a full, rolling boil for at least a minute; this step is crucial for achieving the right consistency and preventing a crumbly bar. Finally, not letting the bars chill long enough can result in a gooey, hard-to-cut mess. Patience is key for perfectly set bars.
What to Serve It With
These no-bake chocolate oat bars are fantastic on their own, but they pair wonderfully with a tall glass of cold milk, a hot cup of coffee, or a scoop of vanilla ice cream for an extra treat.
Tips & Mistakes
Storage Tips
Store in airtight containers in the fridge. It reheats beautifully, but if you sneak a bite cold straight from the container, it still works.
Variations and Substitutions
These bars are wonderfully versatile! For a nutty twist, add 1/2 cup of creamy peanut butter (or almond butter) to the melted chocolate mixture before stirring in the oats. You could also stir in a handful of mini chocolate chips or shredded coconut with the oats for added texture and flavor. To make them nut-free, simply ensure your ingredients are certified nut-free and avoid any nut butter additions. A pinch of cinnamon or a tiny dash of espresso powder stirred into the cocoa mixture can also deepen the chocolate flavor beautifully. While tempting, I’d recommend sticking with the old-fashioned rolled oats; other oat types just don’t yield the same iconic chewy texture.
Frequently Asked Questions

No Bake Chocolate Oat Bars
Ingredients
Main Ingredients
- 2.5 cups rolled oats
- 0.75 cup creamy peanut butter or almond butter
- 0.75 cup honey
- 0.25 cup brown sugar packed
- 0.25 cup unsweetened cocoa powder
- 4 ounces semisweet chocolate chips for topping
- 2 tablespoons unsalted butter melted
- 1 teaspoon vanilla extract
- 0.25 teaspoon salt
Instructions
Preparation Steps
- Line an 8x8 inch square pan with parchment paper, leaving a bit of overhang for easy removal.
- In a medium saucepan over low heat, combine honey, melted butter, and brown sugar. Stir until sugar dissolves and mixture is smooth, about 2 to 3 minutes.
- Remove the saucepan from heat and whisk in peanut butter and vanilla until fully combined and smooth.
- Stir in the cocoa powder and salt until evenly mixed, then fold in the rolled oats until all oats are coated.
- Press two thirds of the oat mixture firmly into the prepared pan to form an even base.
- Melt the chocolate chips in a heatproof bowl over a pot of simmering water or in short bursts in the microwave, stirring until smooth. Spread the melted chocolate evenly over the oat base.
- Crumble the remaining oat mixture and sprinkle it over the melted chocolate, pressing gently so it adheres. Refrigerate for at least 1 hour or until firm.
- Lift the bars from the pan using the parchment overhang and cut into 12 squares. Store in an airtight container in the refrigerator.
Notes
Nutrition
Featured Comments
“New favorite here — absolutely loved. creamy was spot on.”
“Made this last night and it was turned out amazing. Loved how the sweet treat came together.”