CARAMEL CORN
There are few treats that evoke such a strong sense of cozy nostalgia as a big bowl of homemade caramel corn. That perfect balance of crunchy and chewy, salty and sweet, makes it utterly irresistible, especially when you’ve made it from scratch. Forget those sticky, overly sweet versions you find in stores; this recipe delivers a gourmet experience with a deeply burnished, buttery caramel that clings to every fluffy kernel, creating an addictively satisfying snack that’s perfect for any occasion.
In our house, caramel corn isn’t just a snack; it’s practically a family holiday tradition. It all started years ago when my husband, always a sucker for classic treats, confessed his childhood dream was to have a giant tub of homemade caramel corn. I took that as a challenge, and after several sticky, somewhat disastrous attempts, I finally landed on a method that produces perfectly crisp, golden-coated kernels every time. Now, the moment the leaves start to turn, he practically cues the popcorn machine, and the scent of bubbling butter and brown sugar fills our kitchen, signaling that the festive season—and a fresh batch of our favorite caramel corn—is officially underway.
You may also like:
Why You’ll Love This Perfectly Crisp and Chewy Homemade Caramel Corn
- Unbeatable Texture: Achieve that ideal blend of crispiness from the baked caramel and a delightful chewiness that makes each bite incredibly satisfying.
- Deep, Rich Caramel Flavor: This isn’t just sugar syrup; it’s a burnished, buttery caramel with nuanced notes of molasses and vanilla that truly shines.
- Surprisingly Simple: While it feels gourmet, the process is straightforward, using common pantry ingredients and a reliable method that delivers consistent results.
- Customizable: A fantastic base recipe that welcomes creative additions, allowing you to tailor it with nuts, chocolate, or spices to suit your mood.
- Perfect for Sharing (or Not): It’s a crowd-pleaser for parties, gifts, or movie nights, but also incredibly tempting to keep all to yourself for a secret snack stash.
- Nostalgic Comfort: There’s something inherently comforting about homemade caramel corn; it instantly transports you back to simpler times and happy memories.
Behind the Recipe
What I’ve learned over countless batches of caramel corn is that patience and temperature are your best friends. Many people get tripped up by the caramel itself, either not cooking it long enough, resulting in a sticky mess, or cooking it too long, leading to a brittle, burnt flavor. The small touch of baking soda right at the end is crucial; it reacts with the acid in the brown sugar, creating tiny air bubbles that give the caramel its signature light, crispy texture instead of a rock-hard coating. And while it’s tempting to rush the baking time, that low and slow oven bake is what transforms the sticky-coated popcorn into those perfectly crisp, individual kernels that snap with every bite.
Shopping Tips
- Popcorn Kernels: Opt for unpopped, unflavored kernels for the freshest pop and best base flavor. Avoid microwave popcorn as it often contains added oils and salt that can interfere with the caramel.
- Unsalted Butter: Using unsalted butter gives you control over the final saltiness. A good quality butter will also lend a richer, more luxurious flavor to your caramel.
- Brown Sugar: Light brown sugar works wonderfully for a classic flavor, but if you prefer a deeper, more molasses-rich caramel, dark brown sugar is an excellent choice.
- Light Corn Syrup: This ingredient is key for preventing crystallization in your caramel, ensuring a smooth, glossy coating. Don’t substitute with high-fructose corn syrup; stick to light corn syrup.
- Pure Vanilla Extract: A good quality pure vanilla extract (not imitation) makes a noticeable difference in the final aroma and depth of flavor. Add it off the heat to preserve its delicate notes.
- Baking Soda: Ensure your baking soda is fresh, as it’s critical for achieving the light, airy texture of the caramel. Old baking soda can lead to a denser, harder coating.
Prep Ahead Ideas
The most time-consuming part of making caramel corn is often the popping and cooling of the popcorn, and then the baking. You can easily pop your popcorn kernels a day or two in advance and store them in a large airtight container at room temperature. This way, when you’re ready to make the caramel, you’re just a few steps away from the oven. You can also measure out all your caramel ingredients beforehand, setting them aside so they’re ready to go when you start cooking.
Time-Saving Tricks
While I adore the traditional method, a digital candy thermometer is your best friend for quickly hitting the exact caramel temperature, saving you from guesswork and potential re-do’s. Another trick is to preheat your oven and prepare your baking sheets with parchment paper before you even start the caramel. This ensures a seamless transition from stove to oven once your popcorn is coated, minimizing any cooling that might make the caramel harder to spread.
Common Mistakes
- Not cooking the caramel long enough: This is a big one! If the caramel doesn’t reach the proper temperature (usually around 250°F / 121°C for soft ball), it will remain too sticky and won’t crisp up properly in the oven, leaving you with a gooey mess. Use a candy thermometer to be precise.
- Overcooking the caramel: Go too far, and your caramel can burn, resulting in a bitter taste and a hard, brittle texture. Keep a close eye on it, especially after it starts to thicken, and remove it promptly once it hits the target temperature.
- Not stirring during baking: It’s crucial to stir the caramel corn every 15-20 minutes during its low-temperature bake. This ensures even crisping and prevents the popcorn from clumping together or burning on the bottom of the pan.
- Adding baking soda too early: Baking soda needs to be added right at the very end, off the heat, after the vanilla. Adding it while the caramel is still boiling will cause it to react too soon, losing its effectiveness and resulting in a denser caramel.
What to Serve It With
Caramel corn is fantastic on its own as a delightful snack, but it also makes a wonderful addition to a movie night spread, a potluck dessert table, or even as a special homemade gift. I love scooping it into festive bags for friends around the holidays, or simply setting out a big bowl when we have guests over. It pairs wonderfully with a simple cup of coffee or a tall glass of milk, cutting through its sweetness perfectly.
Tips & Mistakes
Storage Tips
Store in airtight containers in the fridge. It reheats beautifully, but if you sneak a bite cold straight from the container, it still works.
Variations and Substitutions
This classic caramel corn is perfect as is, but it’s also a fantastic canvas for creativity. For a salty-sweet twist, try sprinkling some flaky sea salt over the caramel corn just after it comes out of the oven. You can also mix in a cup of roasted pecans or peanuts after coating with caramel for a nutty crunch. For chocolate lovers, a drizzle of melted dark or milk chocolate once it’s completely cooled is always a hit. While you can experiment with different sugars, I highly recommend sticking to brown sugar and corn syrup for the best texture and classic flavor; other syrups might not yield the same crispness and chew.
Frequently Asked Questions
CARAMEL CORN
Ingredients
Main Ingredients
- 0.5 cup popcorn kernels yields about 8 cups popped
- 2 tablespoon vegetable oil for popping
- 0.5 cup unsalted butter 1 stick, for caramel
- 2 cup packed brown sugar
- 0.5 cup light corn syrup
- 1 teaspoon baking soda added at end of caramel
- 1 teaspoon fine sea salt adjust to taste
- 1 teaspoon vanilla extract added after removing from heat
- 1.5 cup dry roasted peanuts optional, for peanut caramel corn
Instructions
Preparation Steps
- Preheat the oven to 250°F (120°C). Line two large baking sheets with parchment paper or lightly grease them.
- Heat a large heavy-bottomed pot over medium heat. Add the vegetable oil and three popcorn kernels; cover. When the test kernels pop, add the remaining popcorn kernels, cover, and shake the pot occasionally until popping slows to 2 to 3 seconds between pops. Remove from heat and transfer popped corn to a very large mixing bowl, discarding any unpopped kernels.
- In a medium saucepan over medium heat, melt the butter. Stir in the brown sugar, corn syrup, and salt. Bring the mixture to a boil, stirring constantly. Once boiling, stop stirring and allow to boil uncovered for 4 minutes without stirring.
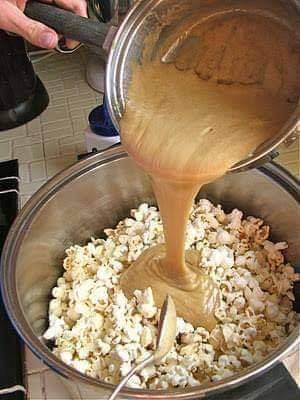
- After 4 minutes, remove the saucepan from heat. Carefully stir in the baking soda and vanilla; the mixture will bubble and lighten in color. Immediately pour the hot caramel evenly over the popped corn and peanuts (if using). Use a heatproof spatula to gently toss and coat the popcorn thoroughly.
- Divide the coated popcorn between the prepared baking sheets in an even layer. Bake in the preheated oven for 45 minutes, stirring and turning the popcorn every 15 minutes to ensure even coating and crisping.
- Remove the baking sheets from the oven and let the caramel corn cool completely on the pans. Break into clusters and transfer to an airtight container for storage.
- Store in an airtight container at room temperature for up to 1 week. For extra crispness, re-crisp in a 250°F oven for 5 to 10 minutes before serving.
Notes
Featured Comments
“Super easy and so flavorful! My family asked for seconds. Saving this one.”
“Super easy and will make again! My family asked for seconds. Saving this one.”