Bisquick Cinnamon Rolls – Sticky, Filling, And DELICIOUS!

There’s something incredibly comforting about the smell of cinnamon rolls baking, especially on a lazy weekend morning. But let’s be honest, making them from scratch with yeast can feel like a multi-hour project. That’s where these Bisquick cinnamon rolls come in. They deliver all the warmth, gooey goodness, and irresistible aroma of homemade rolls with a fraction of the effort, making them a perfect, delightful treat that tastes like you spent all day in the kitchen.
My husband, bless his heart, is a creature of habit, especially when it comes to weekend breakfasts. For years, it was always pancakes or waffles. Then, one Saturday, I was feeling adventurous but also a bit pressed for time, and I remembered seeing a recipe for cinnamon rolls made with Bisquick. I figured, why not give it a try? The aroma that filled our kitchen as they baked was enough to lure him out of bed faster than usual. He took one bite of those warm, sticky, cinnamon-swirled rolls, and his eyes just lit up. From that day on, “Bisquick cinnamon rolls” became the most requested phrase for weekend mornings. It’s now a cherished ritual; the kids even help with the rolling and sprinkling, making it a sweet, shared family moment we all look forward to.
You may also like:
Why You’ll Love This bisquick-cinnamon-rolls-sticky-filling-and-delicious
You are going to absolutely adore this recipe for so many reasons. First, it’s incredibly quick and easy thanks to the Bisquick, meaning you can have fresh, warm cinnamon rolls on the table in under an hour without the fuss of yeast. Second, despite the simplicity, these rolls taste genuinely homemade, complete with a perfectly sticky, sweet cinnamon filling that oozes with every bite. They fill your kitchen with the most comforting, nostalgic aroma, making any morning feel special. They’re also wonderfully customizable, allowing you to tweak the frosting to your liking, from a simple glaze to a rich cream cheese icing. These rolls are the ultimate combination of convenience and pure, unadulterated deliciousness, guaranteed to bring a smile to everyone’s face.
Behind the Recipe
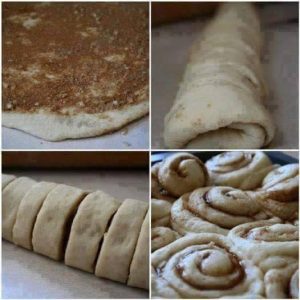
What I’ve really come to appreciate about making these cinnamon rolls is how forgiving and reliable they are, even for a quick version. The key to success, I’ve found, is to handle the Bisquick dough as little as possible; overworking it can lead to tough rolls, and we’re aiming for soft and tender here. For that signature sticky filling, make sure your butter is truly softened, almost spreadable, so it mixes beautifully with the brown sugar and cinnamon and melts into that gooey perfection as it bakes. Don’t be shy with the filling, but also don’t overstuff, as it can ooze out during baking. A gentle hand when rolling the dough into a log helps keep its structure, and cutting the rolls with dental floss or a very sharp, un-serrated knife yields cleaner, rounder spirals. Lastly, resist the urge to pull them out too early; a little golden-brown on top ensures they’re cooked through and the filling is perfectly caramelized.
Shopping Tips
- Baking Mix: Opt for original Bisquick mix. It’s formulated to give you tender, fluffy results without any fuss, making these rolls incredibly quick to prepare.
- Butter: Always choose unsalted butter for the filling and the dough. This allows you to control the overall saltiness of your sweet treats precisely.
- Brown Sugar: Light brown sugar works beautifully here, providing that deep, molasses-rich sweetness and moisture for the sticky filling. Make sure it’s fresh and soft.
- Cinnamon: Invest in a good quality ground cinnamon. The fresher your spice, the more vibrant and aromatic your cinnamon rolls will be.
- Powdered Sugar: You’ll need this for the glaze or cream cheese frosting. Sift it if you have lumps to ensure a silky-smooth finish.
- Milk: Have some whole milk or 2% milk on hand for both the dough and the glaze, as it contributes to the richness and texture.
Prep Ahead Ideas
You can easily prepare the cinnamon rolls the night before by rolling out the dough, spreading the filling, slicing them, and arranging them in your baking dish. Cover the dish tightly with plastic wrap and refrigerate overnight. In the morning, simply pull them out of the fridge about 30 minutes before baking to take off the chill, then bake as directed. You can also mix up your glaze or cream cheese frosting ahead of time and store it in the fridge, ready to spread once the rolls are warm.
Time-Saving Tricks
The biggest time-saver here is obviously the Bisquick! Beyond that, use softened butter for your filling to make it quick to spread. If you’re really pressed for time, a simple powdered sugar and milk glaze comes together in seconds. Don’t worry about perfectly even rolls; a rough cut with a knife will still taste amazing. You can also skip the dental floss trick for cutting and just use a sharp knife, wiping it between cuts to minimize mess.
Common Mistakes
One common pitfall is overworking the Bisquick dough, which can lead to tough, dense rolls instead of light and fluffy ones. Another mistake is not softening your butter enough for the filling, making it hard to spread evenly and resulting in less gooey centers. Underbaking is also common, leaving doughy spots, while overbaking can dry them out. Make sure your oven is preheated properly and keep an eye on them. Lastly, skimping on the filling can make the rolls less exciting, so be generous!
What to Serve It With
These sticky, sweet cinnamon rolls are perfect alongside a hot cup of coffee or a tall glass of cold milk. For a complete brunch, they pair beautifully with some crispy bacon, a fresh fruit salad, or even some fluffy scrambled eggs to balance the sweetness.
Tips & Mistakes
Storage Tips
Store in airtight containers in the fridge. It reheats beautifully, but if you sneak a bite cold straight from the container, it still works.
Variations and Substitutions
While the classic cinnamon-sugar filling is utterly perfect, you can certainly play around with these! Try adding a handful of chopped pecans or walnuts to the cinnamon filling for an added crunch and nutty flavor. A sprinkle of dried cranberries or raisins can also add a chewy, fruity element. For the glaze, a touch of orange or lemon zest can brighten the flavor beautifully, or you could make a rich maple glaze by swapping some of the milk for maple syrup. If you don’t have Bisquick, you can use a similar “complete” pancake mix or even make your own quick biscuit dough from scratch, though the Bisquick is truly king for convenience here. While variations are fun, the pure, unadulterated classic cinnamon-sugar version is often the one people crave most.
Frequently Asked Questions
Bisquick Cinnamon Rolls – Sticky, Filling, And DELICIOUS!
Ingredients
Main Ingredients
- 2.5 cups Bisquick baking mix
- 1 cup milk whole or 2% for best texture
- 1 large egg
- 3 tablespoons melted butter for dough
- 0.5 cup packed brown sugar for filling
- 2 tablespoons ground cinnamon for filling
- 4 tablespoons softened butter for spreading on dough
- 1 cup powdered sugar for glaze
- 2 tablespoons milk for glaze
- 1 teaspoon vanilla extract for glaze
- 0.25 cup granulated sugar optional, to add to dough if you like slightly sweet dough
- 0.5 teaspoon salt
Instructions
Preparation Steps
- Preheat the oven to 375°F (190°C). Grease a 9-inch round or 8x8-inch square baking pan and set aside.
- In a large bowl, whisk together Bisquick, salt, and granulated sugar (if using).
- Add milk, egg, and 3 tablespoons melted butter to the dry ingredients. Stir until a soft dough forms. Do not overmix.
- Turn the dough onto a lightly floured surface and gently roll or press into a roughly 12x8-inch rectangle using a floured rolling pin or your hands.
- Spread the 4 tablespoons of softened butter evenly over the dough. In a small bowl, mix the brown sugar and cinnamon, then sprinkle it evenly over the buttered dough.
- Starting at a long edge, roll the dough tightly into a log. Pinch the seam to seal. Use a sharp knife or dental floss to cut the log into 8 equal rolls.
- Place the rolls cut-side up in the prepared pan, leaving a little space between each. Bake in the preheated oven for 18 to 22 minutes, or until golden brown and cooked through.
- While the rolls bake, make the glaze by whisking together powdered sugar, 2 tablespoons milk, and vanilla until smooth. Add a little more milk if needed to reach desired consistency.
- Remove the rolls from the oven and let them cool 5 minutes. Drizzle the glaze over the warm rolls and serve sticky and warm.
Notes
Nutrition
Featured Comments
“This rich recipe was turned out amazing — the light really stands out. Thanks!”
“Impressed! Clear steps and so flavorful results. Perfect for busy nights.”