
Okay, gather ’round, messy kitchen crew! We’re diving headfirst into one of my all-time favorite, no-fail, make-you-feel-like-a-culinary-genius desserts: the Delish Classic Apple Crisp. Seriously, if you can chop an apple and stir things in a bowl, you can master this. It’s like the cozy sweater of desserts – warm, comforting, and universally beloved. Why should you try it? Because it smells like pure autumn magic, tastes like a hug from your grandma (even if your grandma can’t bake), and takes so little effort that you’ll have plenty of energy left for binge-watching your favorite show. Plus, it’s virtually impossible to screw up, which, let’s be honest, is my kind of recipe.
Speaking of impossible to screw up, you know how some people have kids who politely wait for dessert? Yeah, mine aren’t those kids. The minute this Delish Classic Apple Crisp starts baking, my house turns into a scene from a zombie apocalypse, only the zombies are small, sticky-fingered humans and a very large, hungry husband. “Is it ready yet?” becomes a mantra, followed by increasingly aggressive hovering. Last time, I swear I turned my back for two minutes, and Dave (my dear husband) had already “taste-tested” half the corner piece, leaving a trail of buttery crumbs. The kids, naturally, followed suit, like tiny, adorable vultures. I ended up having to literally stand guard over the cooling crisp with a wooden spoon. It’s a miracle any of it makes it to the table, let alone a photo op. Total chaos, but hey, at least they love it, right?
You may also like:
Why You’ll Love This Delish Classic Apple Crisp
- Reason 1: It basically doubles as a giant, edible air freshener. Your house will smell like cinnamon, butter, and happiness, making everyone think you’ve got your life together (even if you’re wearing mismatched socks).
- Reason 2: It’s deceptively easy. Like, “I might have just impressed everyone without breaking a sweat” easy. We’re talking minimal effort for maximum deliciousness.
- Reason 3: That warm, gooey apple filling contrasting with the crunchy, buttery topping? Pure bliss. It’s the kind of dessert that makes you close your eyes and sigh contentedly.
- Reason 4: You can eat it for breakfast. Don’t look at me like that. It has fruit in it! And oats! It’s practically health food.
Time-Saving Hacks
- Shortcut that keeps you sane: Buy pre-sliced apples from the produce section. Yes, I said it. I’m not ashamed. Sometimes, life is too short to peel and core six apples.
- Hack that saves dishes but still looks like effort: Mix your crisp topping ingredients right in the bowl you used for the dry apple ingredients. Fewer bowls mean less scrubbing. You’re welcome.
- The sneaky “cheat” you always pull when you’re in a rush: A generous squeeze of store-bought caramel sauce over the top before serving. It looks fancy, tastes amazing, and takes zero extra work.
Kitchen Confessions
- The disaster story: One time, I was so proud of my perfectly golden crisp topping. Then I went to pull it out of the oven and, in a moment of sheer clumsiness, tilted the pan just enough for a river of molten hot apple goo to pour onto the oven door. The smoke alarm was not amused. My husband still jokes about the “apple crisp massacre of 2021.”
- A silly mistake you or your family made with this recipe: My youngest once tried to “help” by adding extra cinnamon. She added, like, *a lot* of extra cinnamon. We ended up with what tasted suspiciously like cinnamon challenge apple crisp. Still ate it, though.
- Honest admission: the messy part you secretly skip: Wiping down the *inside* of the microwave. I figure, if it smells good, who cares about the splatters?
What to Serve It With
Okay, let’s be real: Delish Classic Apple Crisp is pretty perfect on its own. But if you’re feeling fancy (or just want to add more deliciousness), a scoop of really good vanilla bean ice cream is non-negotiable. Seriously, the cold ice cream melting into the warm crisp? Divine. A dollop of fresh whipped cream works wonders too, especially if you’re feeling a bit more “elegant.” And if you want to go full-on decadent, a drizzle of warm caramel sauce will make you feel like you’re at a five-star restaurant. Or, if it’s breakfast, a steaming mug of coffee. No judgment here.
Tips & Mistakes
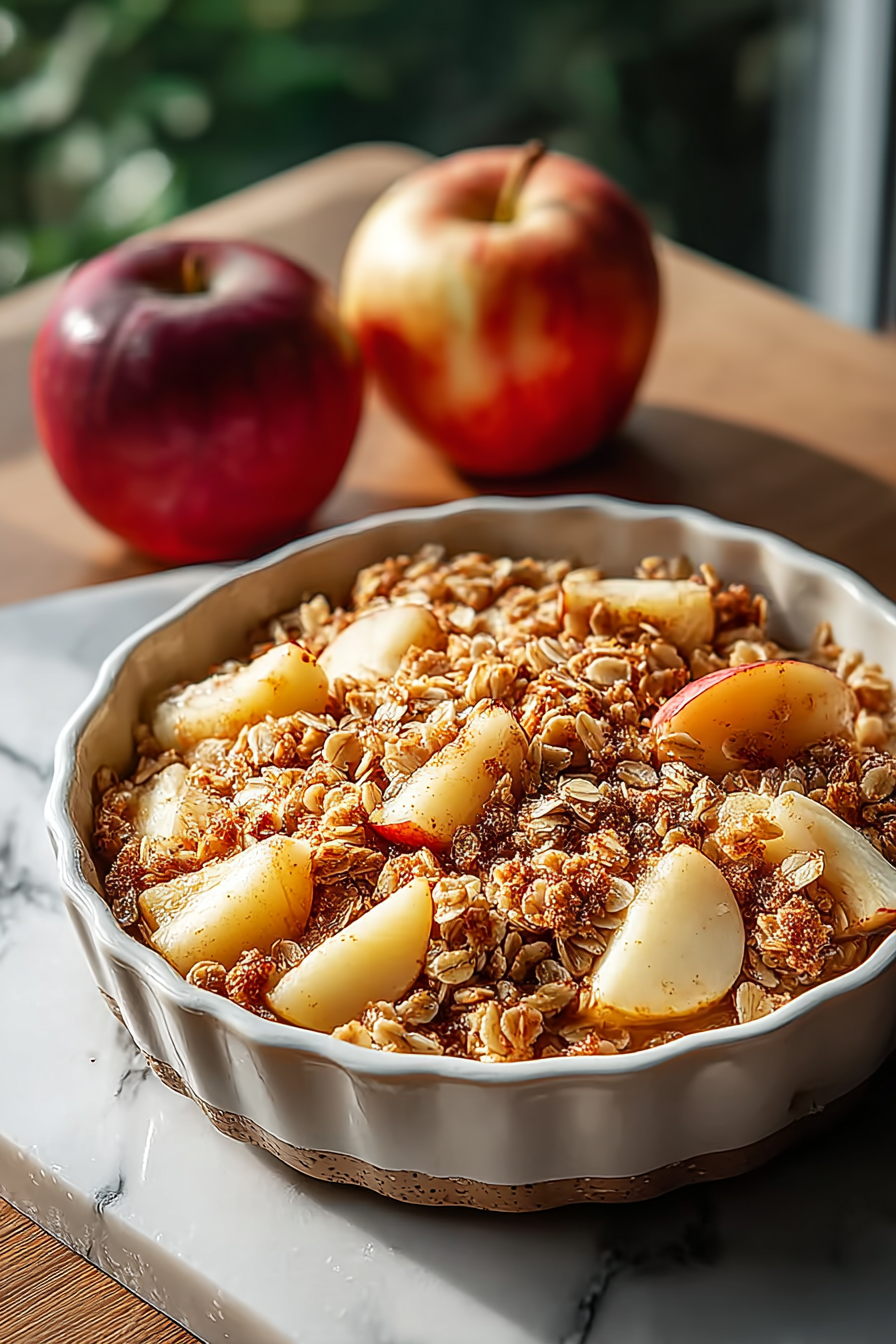
Tip: Use a mix of apples for the best flavor – a tart one like Granny Smith and a sweeter one like Honeycrisp or Fuji creates a beautiful balance.
Tip: Don’t overcrowd your baking dish; give those apples room to bubble and soften evenly.
Mistake: Pulling it out too early! The topping should be golden brown and the filling should be visibly bubbling around the edges. If you’re not sure, give it a gentle poke with a knife – the apples should be tender. If they’re crunchy, keep baking!
Mistake: Not letting it cool for at least 15-20 minutes before serving. That filling is lava hot straight out of the oven. Trust me, I’ve burned my tongue enough times to know.
Storage Tips
Keep it in the fridge… assuming there’s anything left. Midnight cold bites? Honestly better than fresh.
Variations and Substitutions
Swap whatever—honey ↔ sugar, tamari ↔ soy sauce—or skip a step and call it rustic. Still edible. For this Delish Classic Apple Crisp, feel free to add a handful of chopped pecans or walnuts to your topping for extra crunch. A pinch of nutmeg or allspice alongside the cinnamon can also add a lovely depth of flavor. You could even swap out half the apples for pears if you’re feeling adventurous!
Frequently Asked Questions

Delish Classic Apple Crisp
Ingredients
Main Ingredients
- 5 cups sliced apples Use a mix of tart and sweet varieties.
- 1.25 cups oats Old-fashioned or rolled oats work well.
- 0.75 cups brown sugar Packed firmly for sweetness.
- 0.5 cups all-purpose flour A staple for the topping.
- 0.5 cups unsalted butter Melted for the topping.
- 1 tsp cinnamon Adds warmth and flavor.
- 0.5 tsp nutmeg For extra spice.
Instructions
Preparation Steps
- Preheat your oven to 350°F (175°C).
- In a large mixing bowl, combine sliced apples with cinnamon and nutmeg. Toss well.
- Spread the apple mixture evenly in a greased baking dish.
- In another bowl, mix oats, flour, brown sugar, and melted butter until crumbly.
- Sprinkle the oat mixture over the apples in the baking dish.
- Bake in the preheated oven for about 40 minutes, or until the top is golden.
- Let it cool slightly before serving warm with vanilla ice cream.
Notes
Nutrition
Featured Comments
“Impressed! Clear steps and turned out amazing results. Perfect for busy nights.”
“This creamy recipe was so flavorful — the cheesy really stands out. Thanks!”